Sunday, June 26, 2011

Jen's Library - Spousonomics

Spousonomics: Using Economics to Master Love, Marriage, and Dirty Dishes
by Paula Szuchman and Jenny Anderson

Every now and then I browse Amazon.com, trying to find new books I may enjoy reading. I check out the "people who bought this also bought" section, because it usually leads me to similar books, or authors with similar styles, so I can start with a book I enjoyed and use it as a stepping stone to new books.

I read Freakonomics quite a while ago, and loved how they took economic principles and used them to explain all sorts of things that really don't seem to have anything to do with economics, like sumo wrestlers, prostitutes, and crime rates. So using that as a jumping-off point, Amazon suggested "Spousonomics", and I thought it may be worth a try. From the little blurb, it seemed like they'd be applying economic principles to relationships, which is an interesting idea. And when I got the book at the library, all of the reviews on the book jacket are by authors of other works I've liked! Promising!

Sadly, it didn't live up to the hype. It's a marriage-advice book, peppered with economics terms. If you don't like fighting, you're risk-averse. Chores and sex are on a supply and demand curve. We all need incentives, like wall street executives, to get things done.

I wasn't looking for marital advice! I was hoping for some sociology and psychology mixed up with economics, an insight into how economic principles may affect interpersonal relationships. and I didn't get that. I got a sort of Dr. Phil advice book with all sorts of examples of real life couples who could totally fix their marriages if they only applied these principles!

Skip it. Unless you're an economist and your marriage is in trouble, in which case this book might be a godsend.
Saturday, June 25, 2011

Getting a new Passport

My Canadian passport expires in September of this year, and since I'd like to have permission to travel, I need to renew it. The process isn't too terrible, since the Canadian government now has a faster way to renew a passport by mail from the United States: fill out a form, get some new pictures taken, mail it all in with the fee and your old passport, and you'll get your new passport in a month or two.

Well, as usual, nothing in my world is ever as simple as it should be. First of all, getting pictures taken was a huge hassle. I showed up at a Target photo studio, because I was assured over the phone that they do passport pictures there. Luckily, before we got started, I thought to mention to the nice photo lady that these were for a Canadian passport. Oh, no, she said, we can't do those! We looked at the helpful 5 pages of rules and instructions that Passport Canada had me download with my application, and sure enough, the format is different. I figured the photo studio, with all their digital magic, could make it happen, but she said passport photos are done with a Polaroid and they only have one size, 2x2 inches. And mine needed to be 2 inches by two-and-three-quarter inches. Great. She recommended the fancy camera shop at the mall, so I went home and started making phone calls.


Walgreens won't do it.
Rite Aid won't do it.
Costco won't do it.
Picture People won't do it.
Ritz Camera won't do it.
JCPenney photo studio won't do it.

I ended up at Sears, apparently the only place in Maryland capable of taking a picture of me in 2x2.75 size.

The photos are, of course, terrible, because of the rules. Hair off my face, look straight forward, completely neutral expression with no frown or smile. It's a mug shot, really, and it shows me that I should never commit a crime because the photo of me they'll show on TV when I'm arrested will be horrible.

Then it was off to FedEx to mail it all to Canada. I would have loved to use regular old mail, but Canada Post is currently on strike, which means my passport application would not get to its destination because the postal workers are all hanging out and picketing instead of getting the mail where it needs to go.

That particular FedEx office, in Columbia, gets a big fat F for customer service. The assistant manager there treated me like an idiot, rolling his eyes at my questions and telling me "the instructions are on the form". I have never done this before, there are a dozen different forms and envelopes, and you're "helping" your customer by hanging out 20 feet away at your computer and mumbling things at me while sighing at my incompetence. Thanks, jackass. Luckily there was another guy there who was nice enough to walk me through sending this very important package, so it's quite likely that it will get there.

So... now I wait. They say 20 business days is the average turnaround time, excluding the shipping time, so I should get it back soon. I'm nervous about emergency need to travel before then, but I guess that's what the embassy is for. Knock wood that I won't need that!

Sunday, June 19, 2011

Itty bitty tomatoes!

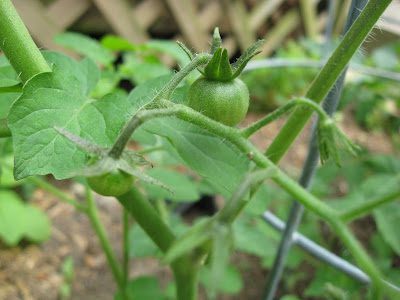
I've got tomatoes! They're tiny and green, but they're here! I managed to mix up my plants when I moved them to the garden, so I'm not sure which are the "Big Boy" tomatoes and which are the cherry tomatoes, but I'm guessing I'll be able to tell soon enough. I've got them caged up and comfortable, but they're too close together so they're sort of sharing cages, with a plant stake and some string making up the slack. So far so good; the big storms we had this week didn't knock them over.


I'm just praying that no critters come to eat them before I get a chance to harvest and eat them myself.

Saturday, June 18, 2011

What's for Dinner - Chicken Parm, Again

The first time I tried this, I didn't have the right cheese, and I forgot to take pictures, no doubt disappointing all three of my fans. This time I have a gorgeous picture of the end result, and an improved recipe to share. Also, I paired it with my homemade fettuccine, so I get extra awesome points.

You'll need:
Chicken breasts
1 egg
Breadcrumbs
Garlic salt
Oregano
Olive oil
Garlic cloves
Tomato sauce
Mozzarella cheese

Get out some chicken breasts, and pound them so they're evenly flat. I used frozen chicken breasts from Costco which were already flat, so I skipped that step, but if you're starting from fresh and they're those huge D-cup chicken breasts, cut them into 2 or 3 pieces, cover them with a sheet of plastic wrap, and then smash them flat with a meat pounder or a small pot.

Beat one egg in a bowl big enough to let you dip the chicken pieces in. Then fill a shallow dish with breadcrumbs - that will be step two. Add some garlic salt and oregano to the breadcrumbs and stir it all with a fork until it's evenly distributed.

Chop 2 garlic cloves into big pieces and smash them flat with the side of your knife so their insides are smooshing out, then put some olive oil (about 2 tbsp) in a frying pan and toss those cloves in. Stir them around a little and pull them out when you're ready to add the chicken.

Salt and pepper the chicken on both sides, then run them through the egg and breadcrumbs before laying them in the pan to cook. Leave them there without touching them for at least 5 minutes to get brown on the bottom, then flip them over and give them another 5 minutes. While that's happening, get some cheese ready, either by grating or slicing very thin. Slice extra if you have a husband who sneaks by and "tests" the cheese quality by eating it all.

Once both sides of the chicken are brown, check the internal temp with a thermometer. Cook them a little longer if you need to. It depends on how hot your pan is and how flat you smashed your chicken. If they're done, move them to an oven safe dish and put a glob of tomato sauce onto each piece before covering them with cheese and sticking them into the oven to get melty. Just put them under the broiler for a minute or two and they'll be perfect.

I actually sliced more cheese than I needed, overcompensating for the presence of the rogue cheese tester, so I covered the chicken with a layer of cheese, then sauce, then more cheese. Which turned out to be a great idea, because cheese is so delicious. If you want to get fancy, you can sprinkle some oregano and some black pepper onto the melted cheese at the very end to make it look special.

Sunday, June 12, 2011

What's for Dinner - Fresh Tomato Salad

I love having a Costco membership, but the danger is that I end up with ridiculous amounts of food every time I go. Most of the time it's frozen or non-perishable stuff, so I've got plenty of time to make my way through it all, but sometimes I'm tempted by the produce section, and with just the two of us here at home, it can be hard to avoid wasting anything. For example, I picked up a huge clamshell container of cherry tomatoes recently, thinking we could use them in salads all week, but honestly, how many tomatoes can you put in an average salad?

That's why I tried making a tomato salad instead, as a side. To be honest, it turned out suspiciously like tomato bruschetta, but the balsamic vinegar and the fact that I am pointedly not serving it with bread is enough to convince me I can call it something different.

Fresh Tomato Salad

40 cherry tomatoes
1 tbsp diced red onion
4 large basil leaves
1 clove garlic, chopped fine
1 tbsp olive oil
1/2 tbsp balsamic vinegar
Generous grind of black pepper


Cut the tomatoes in half, cut the basil leaves in a chiffonade, (little strips) then mix everything together in a bowl or tupperware. Let it sit at room temperature for at least an hour, and mix it up a little to let everything marinate together. It's good cold or at room temperature. I didn't feel the need for salt, but I won't be mad at you if you add some.

Dessert - Yogurt fruit salad

This is a simple dessert for when baking is just too much trouble and your freezer is out of ice cream sandwiches. It's not much fancier than having a fruit or yogurt cup for dessert, but this can be served in fancy little bowls to make it look a lot more impressive than it really is.

Yogurt fruit salad

1 Granny Smith apple, cut into bite-sized pieces
1 cup seedless red grapes, halved
1/4 cup dried cranberries
1/2 cup low-fat yogurt (I used vanilla, but any kind will do)


Instructions:
Mix it up and eat it. Yum.
This amount will fill 4 little dessert bowls.

I don't love Granny Smiths for this because they're very hard and sour, but they're my husband's favorite apple so I used those instead of the Gala apples I prefer. Next time I'm trying a sweeter apple and maybe some blueberries! Almost any fruit will work well for this, except maybe for the citrus family, so go nuts and empty out your fruit bowl for dessert!

Saturday, June 11, 2011

Jen's Library - The Fly in the Ointment

The Fly in the Ointment: 70 Fascinating Commentaries on the Science of Everyday Life
by Dr. Joe Schwarcz

Dr. Schwarcz was one of my professors at McGill University. He's the director of the Office for Science and Society, which is dedicated to spreading information and debunking bad science about all sorts of health and food topics. They do a wonderful job using radio, the internet, and public lectures to make science accessible to the average person. I took one of his "World of Chemistry" courses at school, and it was a ton of fun.

He's written several books, all very easy for the layperson to understand and enjoy, so go ahead and read whichever of them you can get your hands on. Pesticides, bezoars, bottled water, fake blood, broccoli, lithium: he tackles each topic with a short essay, examining and explaining their history and chemistry in a way that's easy to understand and enjoy.

I love that he's writing these books and doing his radio show, and hosting lectures for the public, because there is so much misinformation out there, and someone's got to fight it. The more educated people are, the less they're likely to be confused by all the new nutrition information coming out of scientific studies (coffee is good for you! but it's not! yes it is!), and the more critical they will be of TV stories about the newest greatest miracle cream. A little more critical thinking never hurt anyone (except maybe the quacks selling the new miracle cream), and I think Dr. Schwarcz is doing a good job pushing people in that direction.

A lot of the lectures from the World of Chemistry courses are available online for you to listen to, and I highly recommend them as a productive and educational waste of time.

Friday, June 10, 2011

First harvest - green beans!

I am totally stoked about the fact that I can tag this post with both "garden" and "dinner".

I love green beans, and I was so excited to try growing some on my deck. I am delighted to report that the teeny things from last week are now all grown up and ready to eat! They look delicious and I can't wait to roast them up in the oven with a little salt and devour them tonight.

Picking them was easy, and I hope I managed to leave the plant unscathed so it can keep making me beans. The ones I picked are all about as long as my fingers and a little fatter than a pencil. I had forgotten how fresh-off-the-plant green beans have that weird fuzzy Velcro feeling to them.

I think I picked them at the appropriate time. My taste-test tonight will tell me if I was right. Everything I read online said to pick them just before they start to bulge, but, not having a time machine, I can't anticipate their bulginess before they achieve that state, so I waited until they looked enough like the ones I buy at the store, and then picked them. The best part is, because the plants have more tiny beans on them, I'll get more beans next week too! I wonder how much these things produce over a summer?

It's cool to be eating something I grew myself, even if these little guys weren't grown from seeds. I paid $1.50 for 6 tiny bean plants, plus some money for fancy dirt for them to grow in, and I'm planning on weighing the useful yield of beans, to see how much money I'm saving versus buying them at the store.

My tomato plants have flowers, but no baby tomatoes yet. I will post photos of tomato babies as soon as they arrive!

Monday, June 06, 2011

What's for Dinner - Homemade Chicken and Cheese Ravioli

I used the dough recipe from the back of my ravioli maker, because I didn't have enough eggs handy for the recipe I really wanted to try from the Food Network website.

Pasta Dough

2 cups semolina flour
2 eggs, beaten
1 tsp olive oil
3/4 tsp salt
2 tbsp warm water

Mound the flour in a big bowl, make a well in it, and add everything else. Use a fork to mix it all together until it makes a ball. I found I needed to add 3-4 more tablespoons of water to hold it all together, so just add a bit at a time and work it with your hands until it's a nice ball. Flour the counter or a cutting board and knead the dough for 10 minutes or so, until it's smooth and stretchy.

The kneading was the hardest part. I really didn't know what I was doing, except for a vague recollection of watching Anne Burrell knead pasta dough on her Food Network show a few months ago. I looked online for "how to knead pasta dough" videos and I found this one to be helpful, although my counter is a little bit too high, forcing me onto my toes to knead the dough properly, so it was an exhausting process.

I used my KitchenAid pasta roller attachment to roll out the dough into thin sheets for my ravioli maker, and it was much easier than I expected. I worked with very small pieces so I wouldn't have to stretch my arms out like crazy to support the rolled-out sheets, and it went well. I started on level 1 to smooth it all out, then went up one level at a time until I got to level 5, which is what the instruction book said was a good thickness for ravioli.


My ravioli maker looks like an ice cube tray - you lay a sheet of pasta over it, push down with the press to make pockets, fill up the pockets with your ravioli guts of choice, then lay another sheet over the top before squishing the layers together with a rolling pin. The ravioli maker has jagged ridges between the ravioli sections, and they cut through the sheets as the rolling pin goes over them, separating the squares. I found my rolling pin to be too big to get at the middle parts, so I helped things along by running the back of a spoon along the ridges. The instructions say they're supposed to pop right out, but I had to peel them out of the mold.


I had more pasta than filling, because this recipe makes a ton, so I attached the fettuccine cutter and made a bunch of fettuccine, which I will freeze for later this week.

My ravioli filling

1 rotisserie chicken breast, diced small
1 cup ricotta cheese
1/4 cup grated parmesan
1/4 cup mozzarella
4 fresh basil leaves, chopped
3 generous twists of the pepper mill
Dash of salt

I smooshed all that together with a spoon until it was a chunky paste, and then spooned that into the ravioli mold. I tried not to overfill the mold, because that could make the ravioli pop open when I cook them. When we were ready to eat, I boiled the ravioli for about 6 minutes and added some jarred marinara sauce. I'm sure I could have come up with a better sauce option, but after three hours of work I was getting tired!


I definitely want to try this again. Now that I know what I'm doing, I'm sure it'll be a lot quicker next time. The verdict is that this is superior to most store-bought ravioli we buy, so I'll need to learn to do this faster and freeze the ravioli for later.

My herb garden

By popular request, here is a look at my herb garden, in a flower box by the deck.


From left to right, we have parsley, oregano, dill (beside three measly chives), two giant basil plants, rosemary, and sage. I had some thyme, but I keep killing it, so I won't bother spending the money for yet another thyme plant just to watch it die. That's just cruel. Everything you can see in here except the dill and chives was purchased as a small plant - the seeds I started indoors with my tomatoes, back in the spring, didn't do very well at all, except for a couple of very small oregano and basil plants growing from the leftover seeds I tossed into the box this spring, but you can't see them from this angle because they're still tiny and flat.

The soil is dry and sandy and not very good, so I count myself lucky to have anything growing at all. Next year, time and money permitting, I want to dump this box and fill it with good potting soil so my plants can do better. I think I'll paint it white, too. The flowers and butterflies aren't my style.

Sunday, June 05, 2011

Brush Clearing - part 2

After two afternoons of work, here is what the front yard looks like.


I am so proud of my "after" picture! That was so much work!

The plan to put in hostas and daylilies and various shrubbery has fallen flat due to the amazing number of pine tree roots blocking our shovels, so we opted to put down a fabric weed barrier instead, after getting up as many weeds and roots as possible, and then we dumped some mulch onto it. I'm hoping that once we've done that to the whole area, I can maintain the weedlessness with a half hour a week of patrolling with a bottle of Roundup.

We did get a few daylilies into the ground, and you can see them there, off to the right, behind the mulched area. They naturalize quickly and should spread like wildfire within a few years, assuming they survive the transplant. I also bought two azaleas today because they were $4.49 at Home Depot, cheaper than most of the perennials they have for sale. I will find spots for them under the pines, but they can wait in their pots until next weekend gets here, because I have completely run out of steam.

Banana Bread

I got the baking itch this weekend. Enjoy some banana bread!


Mom's Banana Bread

1 1/2 cups flour
2tsp baking powder
1/4 tsp baking soda
1 tsp salt
1/3 cup sugar
2 eggs
1 cup mashed ripe bananas (3 or 4 medium-sized bananas)*
1/8 cup milk

*The riper the bananas, the more banana-y the bread will taste. So wait for them to look absolutely gross and splotchy before you mash them up for baking. Really, wait it out until they're barely edible and the fruit flies are calling their fruit fly realtors for an open house visit of your bananas.

Mix the dry ingredients and wet ingredients in separate bowls, then pour wet into dry and stir until it's all well blended. If the batter seems dry, add more milk by the tablespoon until it's the right consistency. It should be a little thicker than the average brownie batter. Pour it into a greased and floured loaf pan and bake at 375F for 40-50 minutes (check at 40 with a toothpick, it will come out clean when it's done).

This tastes best with butter smeared all over it. But I say that about a lot of things.

Saturday, June 04, 2011

Brush Clearing

Last fall, we paid some guys to clear out the brush under the pines in the front yard, because there were baby trees and poison ivy and vines choking everything and looking like a jungle. It looked great after they were done, but the thing with plants is that they grow back. Bastards.

Here's what I had to deal with:My neighbor across the street offered me a huge pile of orange daylilies she cleared out from her garden, and I plan on putting them in this area to take over and fight back against the weeds. Or to at least blend in with the weeds and look pretty, so it looks like I'm making some sort of effort in my yard. I also purchased a few hostas recently, with plans to put them under these pines. I have visions of a low-maintenance, jumbled daylily-and-hosta garden under the trees. But first I need to clear out all this crap, including the six inches of accumulated pine needles, and make some space.

After an hour of tugging and ripping and cursing, here's what the front looks like:

So proud of myself!

But now I'm a little itchy and concerned, because of the three-leafed, urushiol-laced menace crawling all over my trees.
I used gloves, and I wore long sleeves and long pants. But reading online, after I was done (I do this sort of thing backwards a lot), I see recommendations about wearing two layers of rubber gloves and several layers of clothing, goggles, and rubber boots. Gently pulling on the vines to uproot them and stuffing them into doubled-up plastic trash bags. Removing the clothes carefully without touching anything and then laundering them immediately, while going to shower in cool water with no soap.

I used regular garden gloves, ripped those bastards up like I wanted them to die, and flung them into a huge pile. I went inside, took off the clothes to toss them in the wash, and then showered in normal water with soap.

I'm paranoid that I'm going to wake up in the morning covered in itchy blisters, despite the fact that the little itches I am feeling all over my body are probably completely psychosomatic and not actually the start of a poison ivy rash.

What's for Dinner - Cheesy Orzo with Chicken and Broccoli

At one of the restaurants in San Francisco, I had a creamy orzo risotto for lunch, and it was divine. This was my attempt to recreate it.

Cheesy Orzo with Chicken and Broccoli

2 tbsp olive oil or butter
1/2 onion, diced
3 cloves garlic, chopped (or smooshed through a press)
4 cups of chicken stock
1 lb orzo pasta
1 cup Monterey Jack cheese, grated (any cheese will do, but this is what the restaurant used)
2 cups broccoli florets
1 cup diced cooked chicken


Use a big pot - a small one will make it hard for you to stir the orzo well and you'll get a stuck-on mess at the bottom. I did!

Saute the garlic and onion in the olive oil or butter until the onions soften, about 3-4 minutes. Add the orzo and stir to coat with the oil, then add about half of the stock and stir well. Bring up to a boil and then lower the heat. Keep an eye on it, stirring a lot so nothing sticks, and add more stock, about a half cup at a time, as the liquid gets absorbed. Note: you may not need all the stock! Add as needed and check orzo (taste it) each time just before adding more! After about 15 minutes, the orzo shouldn't have any bite left to it, and the liquid should be absorbed leaving a creamy pile of tiny noodles. If it still seems too liquidy but the noodles are done, take it off the heat and let it rest, because a couple of extra minutes will help it absorb any leftover stock.

Meanwhile, steam the broccoli florets:
Put broccoli in a microwave-safe bowl, and add a splash of water. Cover the bowl and cook on high for 3 minutes. The broccoli will still have some crispness to them, so if you like mushy broccoli, leave it in for 4 minutes.

In a giant bowl, mix the orzo, cheese, chicken, and broccoli, and stir well. Eat and then put away your leftovers, because this recipe makes a lot.

Friday, June 03, 2011

Garden update - green beans!

I transplanted the tomato plants into the garden today and I'm praying that the yard bunnies don't like salads of tomato leaves for lunch. I haven't caged the plants yet because they're still small, and the cherry tomato plant isn't supposed to get very tall, according to the seed package. One of the plants has a tiny yellow flower, so I think I might be doing something right. Hopefully getting them into the ground will help them grow better.


I started spreading out the green bean plants into separate planters on the deck to give them more room to grow, and I was surprised to see that there are teeny tiny green beans growing on them! It seems awfully early to me, and maybe they grow very slowly, but it's barely June and I wasn't expecting to see anything for a while.


But there they are, teeny little beans, ready to grow up and be eaten. I can't wait!

My herb garden is doing great too, with the basil starting to flower and the sage and oregano growing out of control. I'm going to chop some of those up in the next week to use in recipes! Sadly, I only have three chives, not even enough for one measly baked potato, so I don't think I'll bother trying those again next year unless I buy them as plants instead of seeds.

Wine country - the loot

After a mere two winery visits, it became apparent that we weren't going to manage to visit California's wine country without bringing any bottles back home, so we bought a big shipping box designed for wine bottles, and started filling it up. We had to be discerning, since we only had 12 spots in the box (and because a lot of the wines were expensive), so each wine tasting then became a complicated evaluation not only of whether the wine was good, but whether it was good enough to take up a spot in our box.

"Mmm, this one is great!"
"Yes, but is it spot-number-eight great?"

In the end we brought home ten bottles (and gave one away as a gift), along with some mustards and a caramel sauce from one of the places. These were all wonderful wines and earned their ride home with us. It's a little ridiculous that we brought so many home, because we still haven't opened all of the bottles we bought on our honeymoon in Virginia last year. We're not heavy drinkers, but we like wine - unfortunately, because it's "special" wine, we keep "saving" it for special occasions, and the bottles are piling up.

We'll have to have a wine-tasting party.

Thursday, June 02, 2011

New nephew!

My sister-in-law did a spectacular job building a baby and delivering him into the world yesterday, and I offer the happy family no end of hugs and congratulations. He's adorable and pink and squirmy, she looks fantastic, and everyone's so happy!

Welcome to the world, little guy. I'm looking forward to watching you grow up. Your parents are awesome, and you're so, so, so loved.